Jul 8, 20269 min read
The perfect trail is out thereJun 4, 2020
5 MIN READ

Writer
photo by Philipp Meier

Writer
Lonely Planet may earn a commission from affiliate links on our site. All recommendations and reviews reflect our own independent opinions.
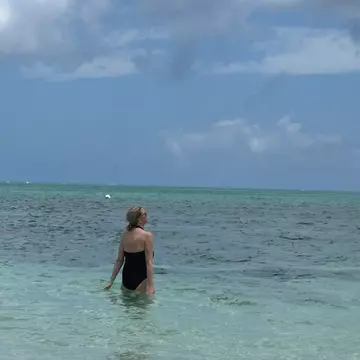
Snapping really good underwater photos while bobbing around in the open ocean is certainly tricky: You have to balance holding your breath while keeping an eye out for surrounding marine life. Not to mention, you don’t want to forget about the waves constantly crashing over you.
Just ask Jenny Sathngam, a professional underwater photographer based in Honolulu. She’s out on the water three to four times a week, so she’s got a slew of sub-aquatic stories to tell. Like the time she and her friend were approached by a young monk seal with a giant, protective mama monk in tow. Or the day she got trapped between a heavy wave and a reef in about two feet of water and twisted her ankle. All in all, though, it’s a dream job. And, lucky for us, she is sharing some of her tips.
The first step is choosing the right time of day to shoot. When on land, you’d avoid the harsh direct sunlight during midday hours and aim instead for early morning and late afternoon to snag golden-hour lighting. But for underwater photography, it’s a whole different story. You need all the sunlight you can get, so it’s best to shoot in the middle of the day in order to capture the light rays piercing through the water.
If you are a newbie when it comes to underwater photography, stick to shallow water while you are still learning. Since less light is absorbed at shallower depths, you will be able to capture truer colors. The other benefit is, you won’t need a strobe light. Pro tip: It’s smart to practice in a swimming pool first to test out your gear and become more familiar with changing the settings while underwater.
Starting with a point-and-shoot waterproof camera at a shallow depth can work really well. Or consider a GoPro, which has a wide-angle lens and is compact and user-friendly. “I don’t think you can beat the functionality and price point of a GoPro HERO8 Black,” says Sathngam. “They have the built-in wide-angle lens (necessary for underwater photos, because water magnifies) and can actually go much deeper than most entry-level DSLR housings can go. Plus, you can send the photos straight to your phone and edit them on the spot.”
If your budget allows and you already know you really want to pursue underwater photography, go ahead and spring for a DSLR, water housing and a strobe. Better yet, rent the gear first.
When Sathngam is not in work mode and wants something less bulky, her go-to is the Nikon Nikonos V, a 35mm film camera that is completely waterproof. She says it makes her feel like an old-school underwater explorer because it’s similar to Jacques Cousteau’s underwater camera.
It’s crucial, of course, to be extremely comfortable in the ocean before attempting to take photos underwater. Whether you are snorkeling, free diving or scuba diving, your swimming and diving skills should be something you don’t have to think twice about. Your main focus should be on getting good photos. That said, taking a course on free diving could certainly be useful. PADI (Professional Association of Diving Instructors) has courses for all skill levels.
It’s also highly recommended you use the buddy system since plenty of things can go wrong underwater. “Not only is it safer, you can photograph your friends in between looking for fish,” says Sathngam. “I usually prefer to photograph people underwater. I think it’s the closest we can get to looking like we are flying.”
If you are shooting with a DSLR and are already comfortable with shooting on manual settings, then by all means, experiment with those settings. However, if you don’t already have that skillset, don’t fret, you can still get professional-looking photos.
"Probably one of the bigger secrets of the pros is sometimes even with the fancy housings, we just shoot on auto,” says Sathngam. “Especially in waves or rough water, the bulk of your attention needs to be on getting in the right spot, staying out of danger and getting your subject in focus. Shooting manual in those situations would only make things more complicated. When you are starting out, try shooting auto until you get the hang of it.”
On a calm day when you can focus on manual settings, Sathngam says she keeps a small to medium aperture (so things are in focus) and uses a higher ISO when needed. This gives you creative control.
Overall, though, she says the most important thing to keep in mind below the surface is that things often don’t go as planned. “Embrace the unexpected and learn to be adaptable,” she says. “There are not many things you can control once you are in the water, so keep your expectations in check and don’t be afraid to shoot a lot when you are first learning.”
Once you are topside, it’s time for some post-production work. This is where photo-editing software (on your computer or on an app) can come in really handy. Two apps that Sathngam likes to use are Adobe Photoshop Express Photo Editor and Adobe Lightroom Photo Editor.
“Even in the clearest water, underwater images usually need a little work afterward to help them pop,” she says. “Don’t overdo it on the edit, though, to keep things looking natural.”
You might also like:
How to photograph Yosemite like Ansel Adams
Explore related stories